
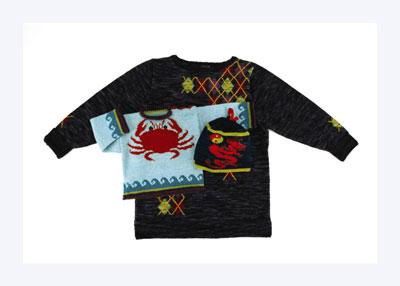
The intarsia knitting technique enables you to introduce areas of
color in any shape, size, and number to the background. Think of these
intarsia areas as islands floating on the sea of their background.
Intarsia fabric is lightweight and fluid because it is only one strand
thick. Intarsia pieces are most easily worked flat in rows and seamed.
The motifs in this technique are made by following knitting charts.
 Not unlike a paint-by-numbers canvas, you place the colored stitches
in an intarsia design by following a chart row by row. Each row in an
intarsia chart follows its own rules, with no restrictions on the number
of stitches or colors used.
Not unlike a paint-by-numbers canvas, you place the colored stitches
in an intarsia design by following a chart row by row. Each row in an
intarsia chart follows its own rules, with no restrictions on the number
of stitches or colors used.
From each main skein of yarn, break off no more than 3 or 4 yards at a time to make a yarn supply. You can add on to a yarn supply if it runs short by splicing or by tying knots.
How you control the yarn sources will depend on how many there are, and how long they are. Here are some options:
Not unlike a paint-by-numbers canvas, you place the colored stitches
in an intarsia design by following a chart row by row. Each row in an
intarsia chart follows its own rules, with no restrictions on the number
of stitches or colors used.
When working in intarsia, it is easiest to use untreated
(non-superwash) yarns. Cotton, silk, and synthetic fibers are much more
challenging to use because they are slippery. Save them for after you
have had some practice using forgiving wools.
Changing colors
With rare exceptions, intarsia is worked flat, back and forth in rows. This is due to its special construction. When changing colors, you drop one strand of yarn and leave it hanging for use in the following row. Each time you change colors in an intarsia design, you do it the same way, regardless of whether you are working from the right or wrong side of the piece.- Attach a new color: Following the chart, work all the stitches you need in the first color. Drop the old strand and forget about it until you need it again in the next row. Tie the new strand around the old one. Work with the new color according to the chart.
- Change strands: To change strands, bring the new color up from underneath the old one. This twists the strands together, preventing holes from forming on the front of the work.
- To knot, or not: It isn’t necessary to knot the strands around one another to keep the knitted fabric secure, because the ends will later be woven in.
Managing your yarn supply
Each area of color in your design requires its own individual yarn supply, resulting in many strands hanging from your work. Whether you create a new supply of yarn for each area of color as you come to it, or prepare them ahead of time by carefully analyzing your design chart. Either way, the amount of yarn needed for each color island will vary, so just loosely estimate how much length you need.From each main skein of yarn, break off no more than 3 or 4 yards at a time to make a yarn supply. You can add on to a yarn supply if it runs short by splicing or by tying knots.
How you control the yarn sources will depend on how many there are, and how long they are. Here are some options:
- Loose strands: The simplest technique is just to let each yarn supply dangle freely from the work. As long as the strand is not longer than 3 or 4 yards, you will be able to pull it free when you need it.

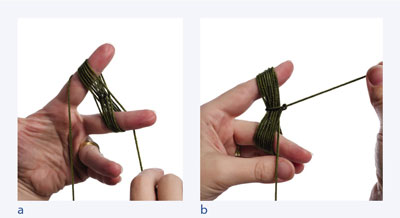
- Butterflies: Rather than letting the strands trail, you can bundle each one neatly into a “butterfly” by winding it around two fingers (a) and tying the end around the center in a half-hitch (b). You pull on the butterfly to release more yarn as needed.
- Bobbins: Another alternative is to wind your yarn supply around a separate object, such as a commercially available bobbin, a homemade cardboard one, or a clothespin. While they are easy to use and keep your yarn clean and tangle-free, bobbins can create tension problems if they add too much weight to each working strand.
Weave in the ends
Your intarsia fabric won’t be finished until all the ends are woven in on the wrong side, using a tapestry needle. Look carefully at the front of the work before weaving in each end. If you notice gaps, holes, or tension inconsistencies, use the yarn tails to correct them from the wrong side. Here are some tips:- Close gaps: To close a gap, run the yarn tail under, through, or around its neighboring strands to create the necessary twist between strands.

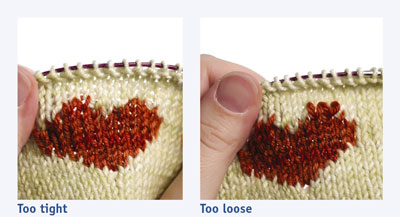
- Adjust tension: Use care to keep the stitches on the right side of the work even when you weave in their tails. Pulling them snugly, neither too tight, nor too loose, will correct the tension on the public side of the fabric.
- Wrong-side duplicate stitch: To preserve the elasticity of your knitting, weave the tails in using duplicate stitch on the wrong side. With your threaded tapestry needle, simply follow the pattern of each knitted stitch from the wrong side.
- Under the purl bumps: Another method for fastening the yarn tails is to zigzag under the bumps of the stitches from the wrong side. To keep the yarn tails secure, run the point of your tapestry needle between the plies of the last stitch or two.
- Color matching: Whenever possible, weave the yarn tail into the back of an area of the same color. This will prevent the weaving from showing through on the right side of the work. Because there will be so many ends to weave in, take a break from knitting every now and then as you work to weave in a few.Source-- http://www.dummies.com/how-to/content/knitting-basics-intarsia.html